

Anyway, a colleague's birthday offered my itchy fingers a perfect excuse to dive into my craft supplies once more. That, plus the fact that I didn't manage to buy anything and his birthday was the very next day.
All out of inspiration, I finally came up with Nothing.
A Jar of Nothing, that is. Came across the idea sometime ago, and found it kinda cute.
I started this project at midnight.

Grab a little plain jar.

Prepare tags and embellishments.
(Make personalised ones from shrink plastic.)

Put it all together.

Wrap it up as elegantly as possible to disguise the Nothingness.
The tag reads:
When people ask you what you wanted for your Birthday, do you ever remember
saying "Nothing"? Well, this time I listened, and made this perfect gift for
you.
Use this idea at your own risk. Reactions and consequences may vary from individual recipients. Mine loved it. Phew!
In the midst of job-hunting and slaving, I took a lil time (cumulatively approx. 8 hours) to make these papercraft Russian Dolls.
 If, like me, you haven't been to Russia or own some authentic wooden ones, you can, like me, make yours from paper.
Download pattern
Download instructions
Just so you know that I'm still alive and kicking, I'm gonna write on some older mini projects that I kept putting off posting about... and by older, I mean more than 2 weeks ago.

Wooden Magnets
The reason why I postponed this is because it's so simple that I'm almost ashamed to call it a craft project. I mean, tell me, how crafty is it to print and cut out nice patterns, paste them onto round wooden blocks, varnish it and stick a magnet behind? Not very.
I'll do better next time around, promise..!
That said, I am all for the concept of beauty in simplicity, and adore these cheery things. No more boring, tacky plastic magnets!
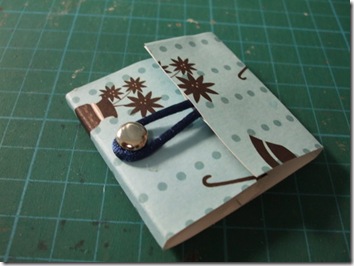
Needed a quick craft fix earlier, so I made this needle matchbox shown in Cut Out + Keep, with some spur-of-the-moment modifications.
Follow all instructions shown, but before gluing the back of the styrofoam to the card, fasten a brad through it without piercing the back cover.
Cut the front flap by about half it's height, tape a loop of ribbon or string into place, and that's it. Now you just need to pop some spare needles in and there you have a handy, pretty pocket needle matchbook!

I don't really need this since I only sew at home, but it was still so fun to make!
I've gone soft and picked up sewing that extended beyond stitching my umbrella spokes back into place.
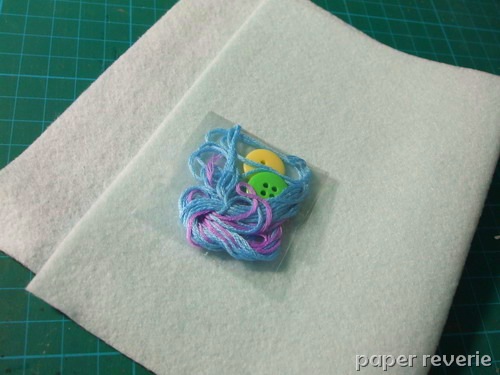
From this:
To this:
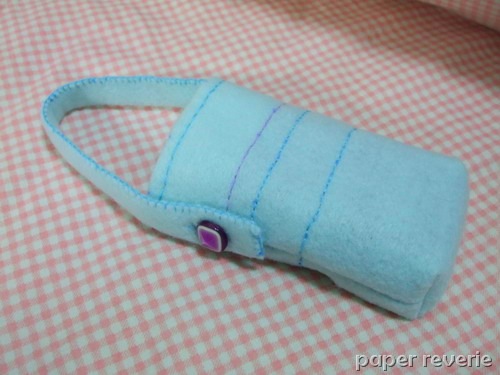
All handstitched from scratch, which was quite an achievement for someone with my level of (im)patience. As you can see, I decided to use a button from my own collection instead. Love Purple.
I must admit, I actually enjoyed it thoroughly! It was just a small, novice project, but I needed the practice before going on to bigger things.
What I've learned from this:
1) Blanket-stitch (learned it in school about 8 years ago, and completely forgotten since then)
2) Boxing corners
More crafts to come, since I hauled back heaps of supplies yesterday, from fabric to metal to wood to paper. Talk about mixed media!
No I haven't been slacking or getting lazy. In fact, I've been crafting every night from dinner till bedtime because the possibilities are endless and I'm getting inspiration from all over.
One problem though. Some stuff I made were good enough as gifts, and if I blog about them, they will no longer be a surprise. So does that mean I'll only blog about lousy stuff unworthy of giving?
Nah... there are still many Good Things to be made not for gifting purposes, but just for learning new techniques and polishing skills.
However, this totally adorable thing below does not require much skill except handling the scissors. Simple but Nice.
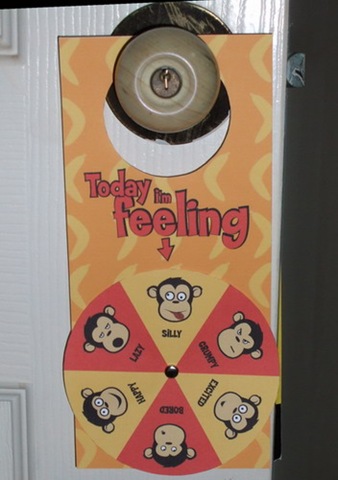
Changeable Monkey Moods Doorknob Hanger
*kiddie voice* I did it all by myself (with credits to HP) and it's MINE! :p
I've since rounded the edges, but I still badly want to laminate it. Is there any way of achieving that without involving laminating / heat-sealer machines yet not having to resort to inferior cellophane tape wrapping? Does spraying varnish or lacquer do the trick well?
Sigh.. so many questions, so little budget.
Btw, Happy April Fool's Day!!
My dinner last night at Bakerzin, Wisma Atrium:
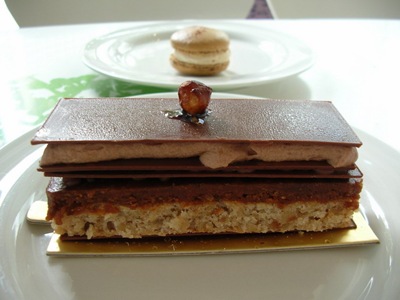
Sweet Pleasure
(Camera conked off, so had to get this photo from Flickr)
The description for this treat at the display counter:
"Layers of hazelnut praline dacquoise, Jivara milk chocolate ganache with fleur de sel, topped with chocolate mousse."
Unwholesome? Fattening? Sinful? Superb?
Yes, yes, yes and yes!!!
Of course, carrying such an enormous sack of guilt, I can't but have soup and nothing much else today.
I love making boxes. Always have. What's not to like? It satisfies my itchy fingers, and if the final product is desirable, it actually helps to DECLUTTER, as opposed to other crafts that once completed, have to be kept somewhere. And hey, if you love making all those other crafts, you could also make boxes to store them. Double bonus!
I'm still considerably green though, so my boxes are still far from perfect. Have a look:

A Japanese-Western fusion box I made on a whim. I don't know why I like to call it that though. Have yet to put a handle/knob on it.
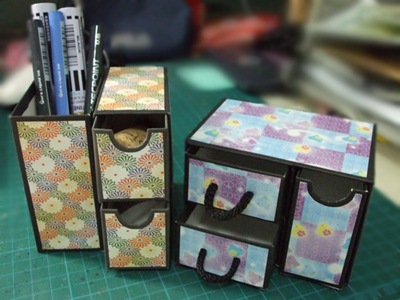
Boxes in the form of little drawers! So adorable and useful for small items
like my quilling tools, handmade embellishments and other thingamajigs.
Yeah, more to come in the near future, I hope. Been busy with work and trying my hand at other things, so I'll get back to this a little later.
Tutorial: Date/Time Conditional Formatting with MS Excel
4 comments Posted by illuminette at 3/19/2008 08:06:00 PMThis is rapidly becoming a blog of all sorts, from a craft journal to one that has everything short of daily ramblings about the mental-emotional typhoons and real-life drama also known as My Life. Sorry, THAT blog is private.
Anyway..
Two days ago, my sub-supervisor (SSP) came to me asking if I knew how to create alerts in MS Excel for when a certain date is reached. This is to serve as a reminder for when calibration of equipment needs to be carried out (every 6 months).
I've been an Excel user for years, but sad to say, I never knew such things could be done. In the past, I've only needed to calculate scientific data and plot graphs/charts, so I've got that downpat. But to create alerts?
This had to be about cell formatting of some sort, so clicking on Format in the Toolbar, I found this previously unnoticed option called "Conditional Formatting". The title itself was obviously the solution to our puzzle. Bingo!
But wait a sec. It's not that straightforward. While it's easy peasy if you, for instance, wanted to highlight cells that contained a specific, static value, it's another story altogether to do the same with constantly-changing dates/times.
I played around with the TODAY() and NOW() functions for a good hour or so. But experimenting with dates meant that I had to wait till the next day to see if any effect took place! I was also too blinded by enthusiasm to use backdating. *slaps forehead*
Anyway, I thought of another way to test results faster, which was to use Time. This meant that my objective would now be to get a cell highlighted in, say, one minute from the current time.
Trying to achieve that took me another working day, and proved futile. Online forums and Help sites didn’t have what I wanted either. No choice but to seek one-to-one professional help – from Chandoo (a.k.a. Pointy Haired Dilbert), “an engineer / manager, currently working with India's largest IT services firm as a consultant”.
After a couple of to-and-fros, he found me a solution. Capital! (Been reading too much Tolstoy…am becoming fond of that word.)
Testing it out right away and to my delight, finding it successful, I proceeded to write a much simplified step-by-step procedure. It was meant for my SSP, in case he asked and I was too lazy to explain, but in case anyone’s interested, I’d put it up here too. For those already savvy and find this topic trivial, click the X at the top right of your browser. :)
STEP-BY-STEP TUTORIAL FOR MS EXCEL CONDITIONAL FORMATTING Objectives: a) Alert when a targeted date is reached. b) Alert when a targeted time is reached. c) Unshade cell when info has been keyed in. a) Alert when a targeted date is reached. Let cells A1 and A2 be used in this example.
b) Alert when a targeted time is reached. Let cells B1 and B2 be used in this example.
Whenever you want to see the spreadsheet recalculating to the latest date/time, press F9. (Keeping the spreadsheet active by keying in info or simply typing randomly in other cells will also refresh the date/time but why do that if you can just press a button, right?) c) Unshade a cell when info has been keyed in. This is useful for spreadsheets that are used by more than one user. There may be blanks that are meant for another colleague to fill in. Usually, we highlight the blank cells for others to see, but it’s troublesome to have to remove the shading when the task is completed.
The formatting will be applied to the whole range of cells selected in step 1. |
As far as I know, all the methods described works for both Excel 2003 and Excel 2007.
Once I understood the concept, I found a bunch of other ways to create time and date alerts. It feels pretty great when you find your own way about things and they actually work.
It’s a very useful tool, Conditional Formatting. You can track changes, check for errors, see only the info you want without going through them one by one like with Ctrl+F, yadda yadda yadda.. Just Google “Excel Conditional Formatting” and you’ll know.
I’m sure gonna be making use of it often from now on!
Over the past month or so, I was told that my mum has been creating loads of luck for us, in the form of old school lucky stars!
My mumsie makes these at a rapid rate, during her TV time. These huge jars hold over 1500 stars each.
When she ran out of jars, she filled up our unused IKEA lantern instead! I think it looks absolutely gorgeous.
Not only do these stars bring us luck, they also make for a great recycling effort. All materials used came from the pesky flyers and brochures that were practically chucked in our faces every other day.
See? No waste! My dad cuts them all up into strips and my mum turns them into pretty little things. What a team!
I like to imagine that when I next return home, our house would be star-flooded and we'd be wading through them. :)
Okay so I've decided that this blog should not be limited to crafts alone, so here's some chocolatey goodness for ya!
Yesterday (Sunday) I tried my hand at the Super Simple Nutella Ice Cream by Clotilde of Chocolate and Zucchini, the slow, time-consuming way. The procedure itself, however, was very simple, and anyone with patience and a whole day to spare could do it.
The quantity, however, does not justify the time and cost of the ingredients. A 375g tub of Nutella ($3.70) and a 405g can of unsweetened, full-cream evaporated milk ($1.43) makes only about 3/4 pint. Factor in the time spent (I spent 8 hours, inclusive of waiting time) and you have yourself a very very precious little tub of ice cream.
(Yes, full-cream. Shocker huh? Never thought I'd ever buy anything full-cream!)
Anyway.....
I took some photos of the process, but a bowl of brown syrupy goop hardly makes for a pleasant picture, so I'll go right ahead to the finale.
The end result was a nicely frozen but still scoopable mass of rich thick, gooey chocolate hazelnut ice cream.
It really was a little sweeter than I'd preferred it to be. Maybe I could use dark chocolate next time for a more bittersweet, less cloying flavor. Still, I'm amazed that it actually turned out so well. Props to Clotilde!
What else should I try making next? I bought a can of garbanzo beans (chickpeas) that I had planned to make hummus with, but I couldn't find tahini in the local supermarkets, and I don't want to use any substitutes for my first trial (coz I'm a stubborn purist). I think I'm just gonna eat the beans from the can for dinner.
So yeah, I would love suggestions that are practical, economical yet give amazing results. And nothing that requires baking since I've no oven here. Tall order huh? Anyway, comments are always welcomed.
Goodnight for now!
On such a cool Saturday night, I wish I was on one of these instead of making a miniature one out of paper..
That said, it was quite a neat little project. I took the risk and used 200gsm card-stock instead of the usual 80gsm photocopy paper. The rigidity made the tabs a little harder to fold and glue into place, but the overall result was really solid and I am so proud of it!
Oh, and by the way, it rotates. :)
I've no idea what I've done..
but it's on the wall above my bed now.
So, I've been away for the weekend and have been slacking since. ;)
This is something I snipped out from red foam last Friday:
The original design had a fancy border with hundreds of tiny fiddly bits that I didn't feel like cutting out. Methinks this simple one looks even more tranquil and focused, although those more pro at papercutting may beg to differ.
No new project in progress at the moment. Spent the whole night tinkering with my new layout. I love how the tree design looks like it would make a fab papercutting design that I'd want to attempt sometime.
Scherenschnitte (shear-n-SNIT- a) which means "scissor cuts" in German is the art of papercutting. The art work often has symmetry within the design. The art tradition was founded in Switzerland and Germany in the 1500s and was brought to Colonial America in the 1700s by immigrants who settled primarily in Pennsylvania. Source: Wikipedia |
While I've never attempted this genre of art, I was also quite overzealous in that I picked one of the most tricky designs for my first try. I came across this insanely pretty design by Heather Moore of skinnylaminx. My first thought was "OMG I have got to try that!" But I could foresee myself making a lot of accidental slashes which would end up in a very frustrated me ripping the paper to shreds, so I strayed from tradition and used craft foam instead.
Unlike in the States or Down Under, the range of craft supplies are really limited, safe for a few specialty stores located too out of the way for me. So when I saw craft foam in basic colors sold rather cheaply at a bookstore, I was delighted and made a grab.
This could even be funky decorative background or something (that you could easily create with like, MS Paint rather than painstakingly arranging foam pieces, but oh well..):
I also bought a pack of black foam, but who wants to look at a photo of a black rectangle, right?
Anyway, back to my project..
First, I printed out the design on plain white A4 paper, and fastened it to the top of a sheet of black foam with binder clips. I also found it quite useful to staple the two layers at parts that'll be cut out later (in this case, the white areas). Just a few will suffice to keep the layers in place. I guess the thickness of the foam also helped keep the staples snug and tight.
Here's what I had just before I cut the final bit (note the stapled part on the far right).
After taking this photo, I realized how similar it was to Heather's, except her papercutting turned out perfect and my foamcutting..erm, not so much.
After messing my desk and floor with a horrendous heap of paper and foam bits, this is the result, placed on yellow foam:
The only reason why I survived this was because foam, although thicker and more resistant to the force of the blade, is also less likely to tear or crumple due to those same characteristics. My paper layer got creased and torn as I moved on working from one section to another. Papercutting takes real skills and patience, and I'm only just learning to maneuver the scissors properly, so I'll stick to foam sheets for practice for the time being. The 3D effect of foam is great too.
So there you go, my first Scherenschnitte. Now I'm hooked!
In chronological order:
1) Golddiggers by Maarten Janssens
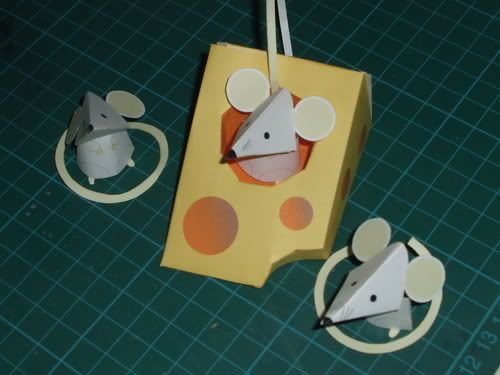
Only upon completion of these cuties did I realise how appropriate they were as well, since this is the Year of the Rat!
2) Mini Gift Bags by Martha Stewart (herself?)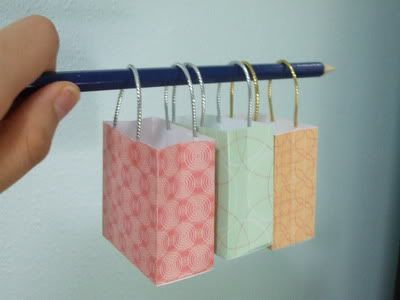
Nothing extraordinary. Just couldn't resist the sweet colours of the templates! The actual title of the project was Miniature Valentine's Day Gift Bags, but I'm sure you can make use of these for any gift-giving occassion.
3) Cute Anime Schoolgirl (update: 5 Apr 2008: this awesome site has closed down!)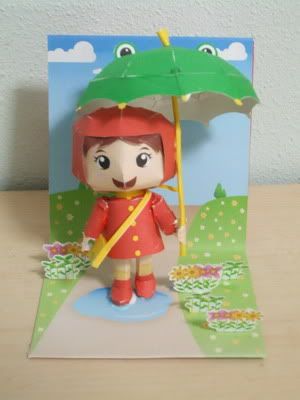 This one proved to be quite challenging for a beginner like me, and it took me two nights (approx. 7 hours) to complete the entire thing. I think it was the most fiddly thing I've made so far. Just look at what I had to cut out just for the head and body alone:

How small?

So cute huh? Well, I survived, and the end product turned out not bad at all, given my amateur skills. *grins*
4) HedKase Kid by Brian Castleforte

The following night I decided to go back to simpler projects so that I could do it while watching American Idol. NiceBunny has some really cool paper toys. I'm not such a fan of robots, cars and other 'macho' action characters, so I only picked the fun ones.
5) Sayuri by Nick Knite

Here's a cute one from the HedKase Artist Series. I also have a few other projects saved up to occupy me another day. But meanwhile I wanted to try some different things first.
6) Rockin' Rudy by Matt Hawkins

Quite easy to make, and oh so adorable, sitting with legs/hooves dangling from the edge of my shelf. His head nods if you poke it (gently!!).

Moved it to a less precarious spot - atop my pocket tissue dispenser!
7) Speakerdog Loves Stripes by Carolina Negret

Speakerdog is another site by very imaginative people who are generous enough to share lovely paper toys for free. Gotta give them props. Lots of it.
Pictured above is my first Speakerdog (from Series 2). They have so many gorgeous ones that you just can't help but make them all and start a collection. I know I would, when I have more storage space.
Yup, those are where all my nights for the past week have gone to, and it was well worth it. I have a shelf-top full of quaint paper things now.. :)
And that's a wrap!
I don't know about you, but I find it therapeutic when paper-crafting, when my mind is completely focused on cutting, folding and assembling with precision, and all my worries and heartache would magically disappear for a while.
Anyway, school and university days left me so worn out that I had no time to indulge in any hobbies other than online chatting and random net-surfing. But now, doing an internship means that after office hours, I have entire nights all for my leisure with no studying and report-writing to stress over. One day, I stumbled across some sites on really cool things that people have done with paper, and got me all excited to pick up my long-lost hobby again.
I'll admit, I prefer to scour the net for free project templates because experimenting on my own designs will take way too long, and I really want to get my hands into the actual joy of producing something fail-proof. Well, I never claim to be an artist. Love for handicrafts does not necessarily translate to talent for designing them, right?
And thus, I leave it to the true pros to come out with absolutely genius stuff. (All crafts shown in this blog will be appropriately credited unless the designer is not known.)
Finally: Please don't laugh at my work! If you must, chuckle or sneer discreetly. I am fragile.